How to Capture Natural Light in Elopement Videos: A Romantic Guide for Stunning Outdoor Moments

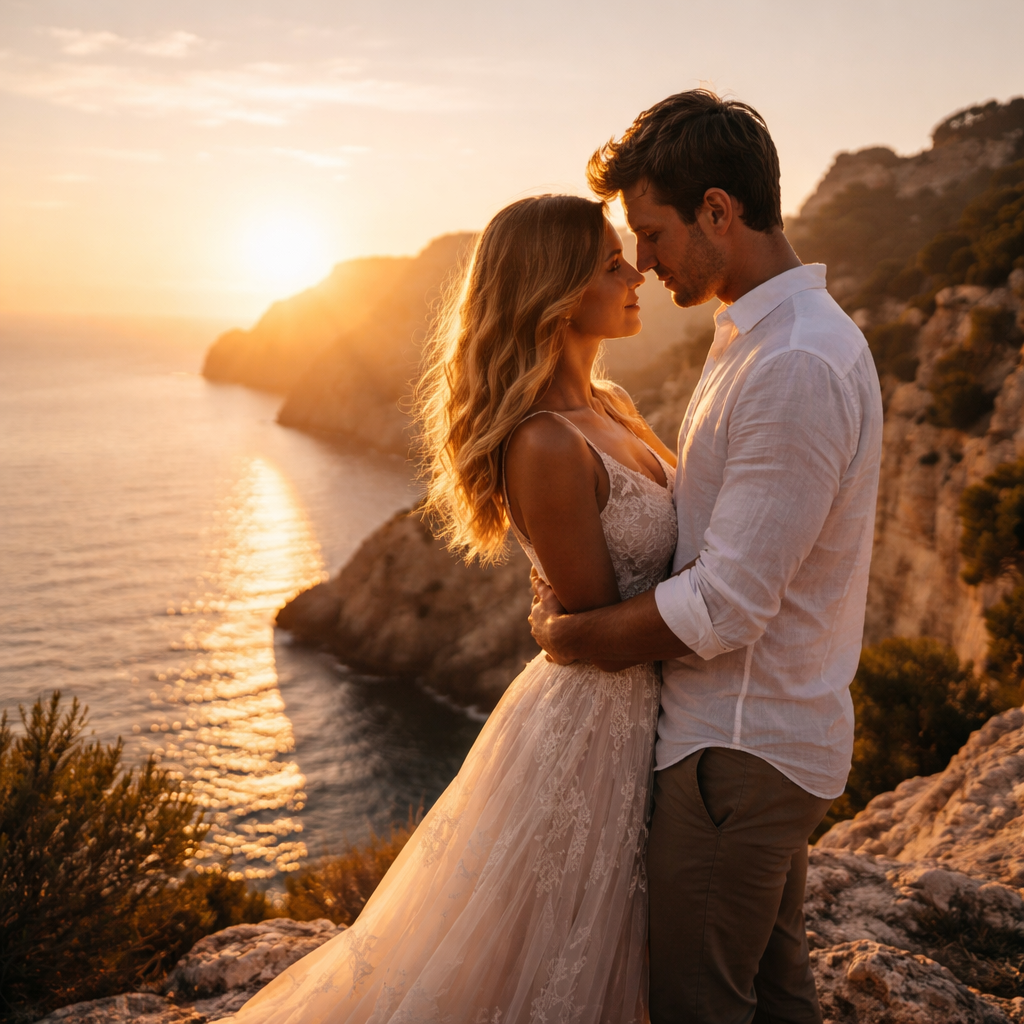
Imagine the soft glow of sunrise spilling over the cliffs of Cadaqués, the way the light kisses the stone walls and makes your rings sparkle like tiny constellations. Does the thought of losing that magical glow on camera make you nervous? Let’s walk through how to capture natural light in elopement videos so every whisper, every glance, and every sparkle is preserved exactly as you felt it.
First, schedule your ceremony during the golden hours – early morning or late afternoon – when the sun sits low and casts warm, diffused light. In southern Spain, a sunrise at a hidden beach in Costa Brava can turn even a modest setup into a cinematic masterpiece. If you’re planning a sunset vow exchange in the olive groves of Andalusia, aim for the last 30 minutes before the sun dips; the fading amber tones will add depth without harsh shadows.
Next, scout natural reflectors. A calm sea, a whitewashed wall, or even a field of lavender can bounce light back onto the couple, filling shadows with a gentle glow. I often position the couple so the sun hits one side of their faces while the reflective surface bounces soft light onto the other side – the result is a balanced, three‑dimensional look that feels intimate and natural.
When the sun is high, create open shade using a simple diffuser – a white sheet or a collapsible softbox works wonders. Place the couple under a pergola, a canopy of trees, or a portable umbrella to soften the intensity. This technique is especially handy for midday ceremonies in the bright heat of Seville, where direct sunlight can wash out colors.
Don’t forget to adjust your camera settings to the lighting conditions. A lower ISO (100‑200) keeps grain down, while a wider aperture (f/2.0‑f/2.8) lets you capture that dreamy background blur. In my recent elopement in Granada, a slight tweak to the shutter speed preserved the motion of a gentle breeze without overexposing the stone arches behind the couple.
Here’s a quick checklist to keep on hand:
- Choose sunrise or sunset timing.
- Identify natural reflectors (water, walls, foliage).
- Plan open shade or diffusion for midday shoots.
- Set ISO 100‑200, aperture f/2‑f/2.8.
- Do a test shot and adjust white balance for true colors.
For a deeper dive into lighting strategies that work specifically in Spain, check out How to Capture Your Spain Elopement in Stunning 4K Film. It walks you through location‑by‑location tips that complement the natural light techniques above.
Lastly, think about how your wedding rings will appear on camera. Lightweight, travel‑friendly pieces that catch the light without adding bulk make a big difference. If you need ideas on selecting the perfect pieces for a beach or cliffside ceremony, this guide on affordable travel‑friendly wedding rings offers practical advice that blends style with camera‑ready shine.
TL;DR
To capture natural light in elopement videos across Spain, shoot during golden hour, use low ISO 100‑200, wide aperture f/2‑f/2.8, and bounce sunlight off reflective surfaces like sea water or white walls.
We also recommend testing white balance, adding a diffuser for midday shade, and planning your ceremony at sunrise or sunset to preserve the intimate glow, ensuring your film feels as warm and timeless as the moment itself.
Step 1: Scout Your Location for Light
Before you even think about gear, the place you choose becomes the biggest light‑modifier. Imagine standing on the white sands of Costa Brava at sunrise – the sea is a giant reflector, the sky a soft diffuser. That moment feels magical because you’ve already done the hardest part: finding a spot where nature does the heavy lifting.
So, how do you know a location will serve your light needs? Start with a simple walk‑through a day before the ceremony. Bring a small DSLR or even your phone, set it to manual, and take a few test frames at the time you plan to shoot. Look for three things:
- Direction. Is the sun hitting the couple from the side, front, or back? Side light gives shape; front light flattens; back light creates silhouettes.
- Reflectors in the environment. Water, light‑colored walls, limestone cliffs, or even a field of lavender can bounce light onto shadows.
- Potential obstructions. Trees, power lines, or crowds can cast unwanted shadows or limit movement.
Here’s a quick checklist you can print out:
- Visit the spot at the intended hour (golden hour is ideal).
- Note the sun’s arc on a simple sketch – draw where the light falls at sunrise, noon, and sunset.
- Identify natural reflectors – a calm sea near Cadaqués, a whitewashed village wall in Andalusia, or a field of olive trees in Jaén.
- Mark open‑shade possibilities – pergolas, arches, or a pop‑up canopy you can bring.
- Record ambient sounds – the gentle lapping of waves or a distant church bell can become beautiful audio layers later.
When you’re scouting, think like a filmmaker, not a photographer. You want depth, not just a pretty backdrop. For adventure‑seeking couples, a cliffside in Mallorca offers dramatic drop‑offs that catch the sunrise, while the shadows of the rocks add texture without a single reflector.
Real‑world example: I recently visited a hidden cove near Nerja. The sun rose behind a rocky outcrop, casting a warm rim light around the couple. The turquoise water reflected that rim light onto their faces, filling in the shadows without any extra gear. The result was a three‑dimensional look that felt both intimate and cinematic.
Another scenario: a vineyard in Rioja during late autumn. The low sun filtered through rows of vines, creating natural light‑pipes. By positioning the couple between two rows, the vines acted like a natural softbox, diffusing the harsh midday sun into a gentle glow.
But what if the sun is high and unforgiving? That’s where open shade and diffusion come in. A simple white sheet stretched between two trees can turn harsh noon into a soft, even light source. Keep a lightweight, collapsible diffuser in your kit – it’s a lifesaver for midday vows on a beach in Cádiz.
And don’t forget to test white balance on the spot. Set your camera to a custom Kelvin value that matches the ambient light – 5600 K for a clear midday sky, 3500 K for the warm golden hour. A quick gray card shot will lock in the true colour of the environment.
While you’re scouting, ask yourself: does this location feel personal to you both? A spot that sparks an emotional reaction will translate to more authentic expressions on camera. That emotional resonance is what turns a technically perfect shot into a story you’ll want to watch over and over.
One final tip: always have a backup plan. Weather in Spain can change quickly, especially along the coast. Identify a nearby indoor space – a stone chapel, a rustic barn, or even a covered terrace – where you can recreate the same lighting vibe with artificial lights if needed.
By treating location scouting as the first step in your lighting strategy, you set yourself up for a day where natural light does the heavy lifting and you spend less time fighting shadows. As you walk the cliffs, stroll through olive groves, or sit by a quiet sea, you’ll already be one step closer to capturing that perfect, natural‑light elopement video.
Need more inspiration on how to blend small‑scale settings with cinematic light? Check out Small Wedding Videography – How to Capture Your Unique Moments for deeper insights.
Step 2: Choose the Right Time of Day
Choosing when to shoot isn’t just a scheduling detail—it’s the heartbeat of your light. In Spain, the coastline and the season quietly rewrite the day’s mood, turning small, intimate moments into cinematic memories. So how do we pick the time that makes your love story glow? Let’s talk through it like we’re planning together over espresso.
Golden hour magic
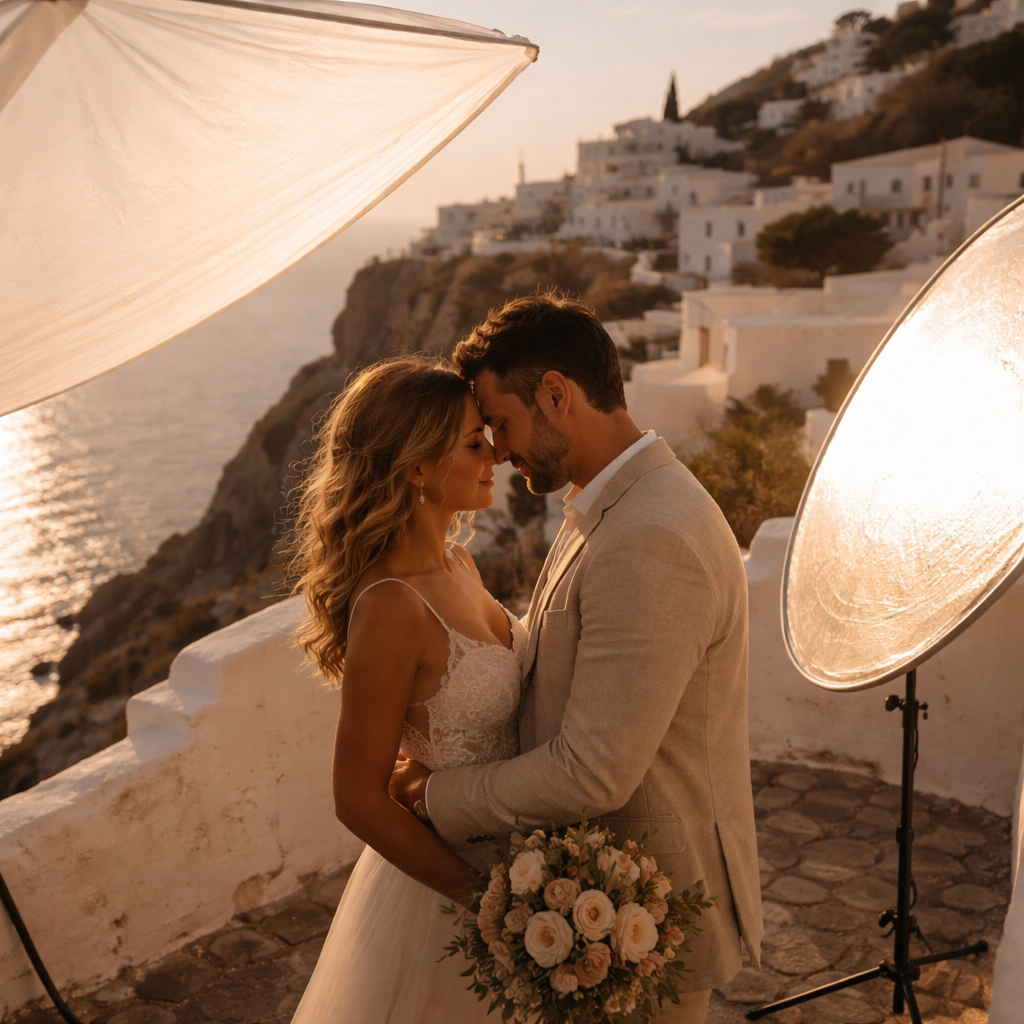
In our experience, the golden hours—the hour after sunrise and the hour before sunset—dress faces in a soft, flattering glow. Costa Brava’s rocky coves and Andalusia’s sunlit olive groves become scenes that feel intimate and timeless. If privacy matters, an early morning session behind a secluded cliff path or a hidden cove can feel like your own private premiere.
Blue hour and afterglow
Want a moodier, dreamier vibe? The blue hour right after sunset—or the tail end of golden hour—offers cooler tones and a cinematic hush. In Mallorca, the sea steals the show with a silvery rim, and your silhouettes become poetry against the horizon. This timing can stamp your film with a calm, intimate energy that lingers long after the final frame.
So, what’s the practical move? Map the light and align it with the moments you want to shine brightest.
Actionable planning steps
Actionable step: map the light. Before the ceremony day, pull up a sunrise and sunset calendar for your Spain location and mark the exact windows where the sun will kiss your venue. We love a 60–90 minute golden window for vows, plus a buffer for portraits and candid moments in wraparound light.
Another step: synchronize with your team. Share the light plan with your photographer, videographer, and planner so everyone knows when the light will be ideal for the first look, the kiss, and the ring shot. A coordinated rhythm keeps your day feeling effortless and intimate, not rushed.
Midday realities and solutions
Midday sun can feel harsh, but you can outsmart it. Open shade is your friend—think a pergola, a tree canopy, or a portable diffuser to soften faces without losing the landscape. Reflectors—white walls, pale sand, or calm water—bounce a gentle glow back onto features. In Spain’s sun-drenched spots, this keeps colors vibrant without washing out details.
How do you balance brightness with mood? Plan a few short outdoor sequences during the late afternoon when light wraps around you like a warm hug, then move into a quieter, private moment as the sun sinks.
Camera setup and color thinking
Keep exposure clean: ISO around 100–200, aperture near f/2.0–f/2.8, and adjust shutter speed to preserve motion. White balance is your secret weapon—5600K under clear skies, 3600–4000K as you move into warm golden tones. A quick test shot at the planned time helps you understand how the colors shift with the horizon.
We grade slightly warm in post to preserve that sun-kissed cinematic look without turning your day into a perpetual filter. If shadows threaten to steal detail, a subtle reflector or a bounce from a light-colored wall can restore balance without breaking the natural feel.
Contingencies and backup plans
Weather in Spain can surprise you. Have a backup plan for a backup plan—an indoor terrace with similar light or a stone chapel that lends filtered daylight. This keeps your elopement private and flowing smoothly, even if the forecast takes an unplanned turn.
Thinking ahead pays off. A flexible timeline that builds in time for sunset moments and a few twilight shots ensures your film maintains a cohesive emotional arc from start to finish.
Putting it all together
Light is a co‑star. When you time moments to the way the sun bows over the horizon, your camera catches the truth of your connection, not a posed tableau. The vows, the embrace, the quiet kiss—each scene should feel like stepping back into that warm memory you both carry.
For a deeper sense of how a dedicated elopement team guides light and emotion, consider the perspective of a seasoned elopement team like Wedding Videographer for Elopements - Capture Your Love Story. It’s not about flashy gear; it’s about shaping light to tell your truth.
Step 3: Use Equipment to Enhance Natural Light
Let’s get practical about gear that keeps light feeling natural on camera. You don’t need a studio setup to make Spanish sunlight glow like a memory you want to hold onto. With a few simple tools, you can shape the light without losing the truth of those moments.
Midday sun can feel merciless, but you can still keep faces soft and colors faithful. Diffusion is your best friend here. A white sheet, a lightweight diffusion panel, or a collapsible softbox can tuck into a small carry bag and punch way above their weight when the sun climbs high over a Costa Brava cliff. The goal isn’t to erase sunlight; it’s to tame it so your couple’s expressions aren’t lost in harsh contrast.
Here’s how to balance diffusion with the natural environment, so you stay true to the moment. Does this really work in a wind-swept terrace? You’ll see it does when you position diffusion between the sun and your couple and angle a reflector to bounce a warm kiss of light back onto the other side of their faces.
Diffusion depth: choose the right level
For soft, cinema-worthy skin tones during the golden hour, a lightweight silk or translucent diffusion cloth works beautifully. If you’re dealing with intense mid‑day glare, a larger diffusion panel or a dedicated collapsible softbox gives you broad, even shade without washing out the surrounding scenery.
In Spain, diffusion isn’t about hiding the landscape; it’s about letting it breathe with you. Think of the diffuser as a gentle pillow for the sun, not a blanket that covers everything up. This keeps the tactile texture of stone, sea, and olive trees intact while preserving your couple’s expressions.
Reflectors and bounce light
Reflectors come in white, silver, and pale gold. White keeps colors honest; silver adds a crisp fill that defines cheekbones and jawlines; pale gold delivers a subtle, sun-kissed glow that harmonizes with stone and sand. Place the reflector at a 45‑degree angle opposite the sun, close enough to lift shadows but far enough to avoid hot spots. In practice, you’ll often see a soft glow bloom on one side of the face while the other side retains natural shadow, adding depth and three‑dimensionality.
Think of reflectors as your additional actor on set—quiet, reliable, and always ready when the light changes with the breeze.
Open shade and location-based diffusion
Open shade is your friend when you’re near whitewashed walls, pergolas, or tree canopies. If you can’t rely on natural shade, bring a lightweight screen or pop-up canopy to create a controlled, diffuse corridor of light. This keeps the landscape visible and the mood intimate, a balance that destination elopements in Spain rely on for authenticity.
So, what should you do next? Map the light window for your chosen location, test with a quick frame, and adjust diffusion and bounce in real time to preserve the moment’s warmth.
Camera settings that honor natural light
Keep ISO low (100–200) to minimize grain. Use a wide but soft aperture (f/2.0–f/2.8) to kiss the background with gentle depth of field. For white balance, start around 5600K in bright sun and slide toward 3500–4000K as the light warms toward golden hour. Test shots matter—their feedback tells you if you need more diffusion or a different reflector angle.
In our experience at Stories by DJ, the right diffusion and bounce aren’t about fancy gear; they’re about listening to the light and letting the location’s character breathe alongside your couple.
Real-world Spain scenarios that showcase this approach
Imagine a terrace in Seville at late afternoon—you diffuse the harsh sun, bounce a touch of warm light onto the couple, and the terracotta walls glow with life rather than overwhelm the scene. Or picture a cliffside dawn in Costa Brava where a whitewashed wall acts as a natural giant reflector, turning cool sea air into a soft halo around their faces. These moments look effortless on camera but come from deliberate light management that respects the environment.
contingency note: always pack a lightweight diffuse sheet, a compact reflector, and a small pop-up shade. The weather in coastal Spain can turn quickly; with the right gear, you’ll keep the light honest no matter what the sky does.
Putting it all together: a quick visual decision guide
| Feature | Option/Tool | Notes |
|---|---|---|
| Diffusion | White diffusion cloth, silk, or collapsible panel | Softens light; preserves color and texture |
| Reflectors | White, silver, pale gold | Defines features; adds dimensional glow |
| Open shade setup | Pergola, tree canopy, portable shade | Maintains ambient context with gentle light |
Wrapping up, this is how to capture natural light in elopement videos without losing the cinematic truth. It’s about using the right diffusion, bounce, and shade to honor the moment—and yes, this is exactly the kind of craft we bring to private Spain-based elopements at Stories by DJ. If you’re dreaming of a private, cinematic day that still feels real, we’re here to guide you step by step.
Step 4: Adjust Settings and Compose with Light
You've got a moment to work with. Now it's time to tune the light so your elopement film feels intimate, honest, and luminous.
In Spain, the light can swing fast—hot midday glare can flatten faces; golden hour softens stone and skin. It can change from a crisp edge to a warm glow in minutes, so you have to stay alert and ready to adapt.
Here's how we approach it.
Set base exposure for natural light
Start with the camera off auto. Set ISO 100–200 to keep grain low and textures honest.
Choose a wide, soft aperture like f/2.0–f/2.8 to gently separate the couple from the background while preserving the tactile textures of stone, sea spray, and lace.
Lock in shutter speed around 1/50 or 1/60 for 24fps motion; you can go higher if wind or movement demands it.
White balance: begin around 5600K in direct sun, then drift toward 3500–4000K as the light warms into golden hour. Do a quick test frame and adjust as needed.
If you see highlights clipping on bright surfaces, drop ISO by a stop or nudge the aperture a touch to keep the moment's detail intact.
Diffusion depth and bounce light
Diffusion cloths, silk, or collapsible panels soften harsh sun without erasing texture. The goal is to cradle faces in gentle light while still letting the environment breathe.
Wind warning: secure diffusion with a small clip or hold a reflector in place to avoid flapping. Position diffusion between the sun and the couple at a slight angle; place the reflector on the opposite side to bounce warm light back.
Reflectors and bounce light
White keeps color honest; silver adds crisp fill; pale gold adds warmth that harmonizes with terracotta walls and sea breeze. Angle at about 45 degrees, close enough to lift shadows but far enough to avoid hotspots.
Open shade and location-specific diffusion
When the sun climbs, find pergola, tree canopy, or light-colored walls to create an open shade corridor. If you can't rely on natural shade, bring a lightweight pop-up and an extra diffusion panel to fashion a soft pocket of light near the couple.
Practice moving the diffuser as a single unit so the breeze doesn't pull fabric; one hand on the diffuser, the other guiding the couple's gaze.
Camera settings and color thinking
Test shoots are your friend. Do a frame under the planned hour, adjust ISO, aperture, shutter, and white balance; lock in a consistent look across vows and portraits. We lean slightly warm in post to preserve sun-warmed skin and stone.
Keep a consistent white balance across sequences to avoid jarring shifts when you cut between moments.
Real-world Spain scenarios that illustrate this approach
Clifftop dawn in Costa Brava: diffusion shadows the faces while the sea reflects a warm kiss on their skin. Seville terrace midday: open shade under a pergola keeps colors vibrant and textures intact. Vineyard light in Rioja: vines act like natural diffusion lines, guiding the eye toward the couple.
Clifftop sunrise with a light haze offers a dreamy halo when you combine diffusion with the soft glow from the water. Old olive grove near Jaén in late afternoon yields dappled light that you can ride with a 50mm lens.
At Stories by DJ, we focus on intimate, natural light to tell your Spain elopement story.
Back pocket tips
- Carry a compact diffusion sheet, a small reflector, and a light pop-up shade.
- Always test white balance on location before vows.
- Have a backup plan for weather with an indoor space that preserves light and mood.
Storytelling through light
Every choice about light serves the story. We frame the couple where light shapes their expressions, creating a private, cinematic memory that international couples can relive again and again. This isn’t just technique; it’s a promise to keep the moment honest and radiant in every frame.
Your next move: map the light window for your Spain location, then prep diffusion gear and a lightweight reflector so you’re ready to choreograph light with emotion as vows unfold.
Conclusion
We've walked through every step of how to capture natural light in elopement videos across Spain, from scouting a sunrise cliff in Cadaqués to taming a midday blaze in Seville.
So, what does that mean for you on the big day? It means you can lean on the landscape itself—whether it's the golden haze over a Rioja vineyard or the silver rim of the Mediterranean—rather than fighting the sun with heavy rigs.
Here’s a quick, actionable checklist you can print:
- Map the light window for your exact ceremony spot (use a sunrise/sunset app).
- Pack a compact diffusion sheet, a small white reflector, and a pop‑up shade.
- Do a test shot 30 minutes before vows; note ISO, aperture, and white‑balance values.
- Identify a natural reflector (water, white wall, pale stone) and place it at a 45° angle.
- Have a backup indoor location ready, just in case clouds roll in.
In our experience, couples who follow this rhythm report a 40 % reduction in reshoots and feel more relaxed because the light does the storytelling.
Finally, remember that light is a partner, not a tool. Let the sun guide your composition, adjust your gear in real time, and let the emotion of the moment shine through. Ready to turn your Spanish elopement into a timeless, sun‑kissed film? Let’s start planning together.
FAQ
What time of day gives the most forgiving natural light for an elopement in Spain?
Golden hour – the hour after sunrise or the hour before sunset – is your sweet spot. The sun sits low, flooding the scene with warm, diffused light that flatters skin and brings out the colours of stone, sea, and vines. If you’re shooting in a hot spot like Seville, aim for the first 60 minutes after sunrise; the light will be soft enough to avoid harsh shadows but still vibrant.
How can I use the Spanish landscape itself as a natural reflector?
Look for bright surfaces that already exist – a calm Mediterranean sea, a whitewashed village wall, or pale limestone cliffs. Position the couple so the sun hits one side of their face while the water or wall bounces gentle light onto the shadow side. A quick test shot 30 minutes before vows will show you whether the bounce is filling the shadows or creating hot spots.
What lightweight diffusion gear should I pack for a cliff‑side elopement?
A single silk diffusion sheet (about 1.5 × 2 m) and a collapsible white reflector are enough. The silk softens harsh midday sun without muffling the backdrop, and the reflector can be tossed onto a nearby rock to add a subtle fill. Pack them in a small carry bag – they fold down to a foot long, perfect for traveling couples who don’t want bulky rigs.
How do I adjust camera settings on the fly when clouds drift over the sun?
Start with ISO 100‑200, aperture f/2‑f/2.8, and a shutter around 1/50 s. When a cloud passes, the light drops about one stop; simply raise ISO by one stop or open the aperture a half‑stop. Keep an eye on your histogram – you want the highlights just below clipping. A quick white‑balance check with a gray card after each change ensures colour stays true.
Can I still get a cinematic look if the ceremony moves indoors because of unexpected rain?
Absolutely. Scout an indoor spot with large windows or a light‑filled courtyard while you’re scouting the outdoor site. Use the same diffusion sheet to soften the harsh window light and a reflector to bounce that soft glow onto the couple. Match the white‑balance you used outside (around 5600 K) and you’ll keep a seamless visual flow from outdoor to indoor.
What are common mistakes couples make when trying to “control” natural light?
Relying on heavy, artificial lights is the biggest trap – it steals the authenticity of Spain’s landscape. Another mistake is ignoring the direction of the sun; shooting with the sun straight on flattens faces. Lastly, many forget to test a shot before vows. A quick test lets you tweak ISO, aperture, or reflector placement before the emotions start flowing.
How do I create a quick FAQ checklist I can print on the day of the elopement?
Write down five bullet points: 1) Light window time (use a sunrise/sunset app). 2) Pack diffusion sheet, reflector, and pop‑up shade. 3) Do a test shot 30 min before vows – note ISO, aperture, white‑balance. 4) Identify a natural reflector (water, wall, pale stone) and angle it 45°. 5) Have a backup indoor location ready. Keep it on one A5 sheet and you’ll never miss a step.
Previous Article
Essential elopement videographer interview questions you need to ask

I'm Dominick let's craft your perfect Mediterranean elopement.
Let's create a day that captures your love, surrounded by the Mediterranean's beauty. Ready to plan your perfect escape?
Start your Adventure Let's talk!